PhotobucketPhotobucketPhotobucket

Wednesday, April 16, 2014

Bridesmaids Gift Ideas

I get asked all of the time about gift ideas for hosts, bridesmaids, etc. 

One of my oldest friends is getting married next month and she asked me
specifically if I had any ideas for bridesmaids gifts.  
My response was "Yes! Lots!".

Here ya go!


Here in the South, monograms are a must!
Seriously, people will put their initials on anything. (see post here).

What was your favorite gift as a bridesmaid?

Tuesday, April 15, 2014

Our Latest Project: A Brick Wall!

I have always wanted to have a house that has an exposed brick wall.  
It just adds so much character and gives it a real historic feel.

Being that our house is brand new, we don't have the option of
 tearing out old walls and finding a beautiful hidden brick treasure.  
So what did we do?  We created our own!

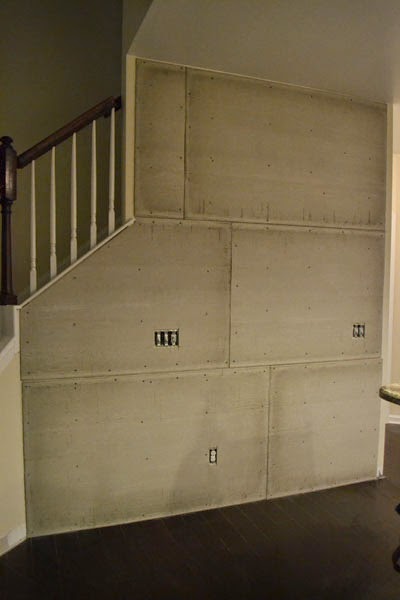
There was this awkward wall between our kitchen and living room
that I just wasn't sure what to do with.  

(This was after we tore the trim off and started the process)

Was it the kitchen?  Was it the living room?
I wasn't sure.
So I knew I wanted to accent it somehow.  Wallpaper, accent paint color, picture wall?
This is where my husband took a deep breath and braced himself for what was about to come.
He loves it when I search for ideas :)

Brick!
  
We looked around all of the home improvement stores for the brick veneer tiles and it was SUPER expensive.  This wall isn't that big - about 100 square feet.  With the brick veneer tiles that they sell, it was going to cost about $1000!  Not what we wanted to spend.

So, being our frugal selves, we decided that we would make our own brick veneer.
We were lucky enough to be given all of these beautiful bricks!


They were a mess!  They had been sitting in a wooded area for who knows how long.


We just had to wash them, rid them of their former tenants (there were TONS of these),


 and cut them.  We cut both sides off of them.  So we got 2 veneer pieces from each brick.


Yes...all 200 of them.


So here's our homemade veneer...


Now it was time to prep the wall and start putting it up.
We added cement board to the wall and then started putting the brick tiles up with versabond.


We added spacers in between while it was still wet for even spacing and to prevent the tiles from slipping.


Oh, and you have to use these spacers on your outlets and light switches
 since your wall is sticking out a lot further now.  


Once all of the bricks were up, it was time for the grout.  


We put this in by using a grout bag.  This thing could ice like a million cupcakes :)


Let it sit for a few minutes and then smooth it out with this handy little tool.


And there ya go!
A beautiful brick wall.


It was definitely an intense process but it was well worth it.
I think this was a great way to accent this wall and I couldn't be happier with the way it turned out!

How do you accent random walls??


Thursday, April 3, 2014

Spring Time in Savannah


I am soooo happy that it is finally Spring!
I know what you're thinking - what do YOU, a Southerner, know about Winter?
You're absolutely right.  We haven't had it nearly as bad as others but this Winter has been brutal.
I mean - a two day ice storm, come on! 
We just don't know how to handle that craziness.
We are all in desperate need of a little sunshine and warmer weather.

I can't believe that it is already April.  With that being said, we better all get ready for the rain.
Hey, I'll take rain over ice any day.

With rain on the way, umbrellas are a must!
Can we just pause a moment to talk about that?
I don't usually like to carry one.  I'd almost rather have wet hair and soggy clothes than carry an umbrella.
I'm just not really coordinated enough to carry one I guess.
I'm ok as long as I'm just walking along but don't throw any other tasks at me.
Oh, and as long as no one walks beside me. Yea, watch your eyes.

I just hate the getting in and out of the car thing.
What is the proper way to do that any way?  I still haven't figured it out.  
I just awkwardly hover my umbrella over the car door, of course dripping water all over the panel of my door.  Then somehow I'm suppose to figure out how to slip my way into the car?  Yes, that always ends with me getting my butt and back wet.  Anyone else?  
Then comes the hard part -- how in the world do you close the umbrella?
It's not just me right??

Well, having sloppy/frizzy hair isn't always an option so I am forced to carry an umbrella at some times.
So if I've got to do it, here are a few umbrellas that might add some style to my clumsiness...


You know what they say, April showers bring May flowers!
Unless you live in Savannah...we've had blooms since February :)

Happy Spring!


Friday, March 28, 2014

Half Bath Makeover

First of all - please excuse these horrible cell phone pictures.  

Secondly, this bathroom is quite possibly the smallest room in the world so getting a full picture of the room was completely out of the question.  So this corner is pretty much all you're gonna get.
You'll get the idea though and see this corner go through quite the transformation.

Our half-bath was very basic to start.  There were just plain walls painted with flat beige paint.  There was no crown molding or trim of any kind.  So we pretty much started from scratch.

My handy husband (Dan) started out by taking everything out of the room.  That included the toilet and the pedestal sink.  Like I said, very basic.

Dan made board and batting with MDF (medium density fiberboard).  This is a pretty inexpensive building material that is a lot smoother than wood.  The only downfall would be that it makes a crazy mess when cutting it with a table saw.  I swear I'm still cleaning it out of our garage.

Once we had the look we wanted, the nail holes had to be filled in with putty and sanded down.


Now, time for paint!


Once the board and batting was painted, we painted the whole room white.


Now it was time to start with the stencil!

I knew that I wanted to do something special with this halfbath, I just wasn't sure what.
I originally wanted to do wallpaper but I couldn't get over how expensive wallpaper can be.
So that's when I came across Cutting Edge Stencil's website.
There were so many cool stencils to choose from!  This site is great.

I found the trellis stencil and instantly fell in love! 
 It was just what I was looking for.  And get this...only $39.95!
You pay for your stencil once and you can use it over and over.
People are using these stencils on walls, ceilings, furniture, and even curtains.

So here is how it started...


It was pretty tedious work, I'm not going to deny that.  
If you aren't sure how it works, check out one of their tutorial videos here.

After a couple of hours, this is what we ended up with.
Again, please excuse the cell phone pictures.  
It was night time at this point too so no more natural light.


Once we got everything put back in, this is our final result...


We are very happy with how it turned out.  I promise to get a better picture with an actual camera.  
Better pics to come!


Thursday, March 27, 2014

A Blush & Gold Wedding


With my husband and I just celebrating our two year wedding anniversary, I was inspired to create that wedding blog post that I've been thinking about for years now (two years to be exact).

We were married in beautiful Savannah, Georgia at the Georgia State Railroad Museum (formerly known as the Roundhouse Railroad Museum).  This couldn't have been a more perfect setting for our taste.  We knew that we wanted to do something with a rustic/vintage feel.  When we visited this venue and I saw the free standing old brick walls in the courtyard I was instantly sold.  I immediately starting picturing how every single detail would play out.  We are what you might call "DIYers" or even cheap at some times.  My husband and I both like to take inspiration from numerous places and then create our own version.  So this rough around the edges, no where close to being perfect setting was just what we were looking for.

I was planning my wedding right at the start of Pinterest, aka "the wedding planner's crack".  So you can only imagine how many hours were spent on this site searching and digging for ideas for our perfect wedding.  Just typing the words 'rustic wedding' into the search engine on Pinterest had my eyes lighting up, my heart pounding, and my future husband's hammer moving :)  I planned every single detail from the appetizers at our rehearsal dinner to the length of the sparkler at our exit.

With all of that being said, this wedding was my 'baby' and I am proud to show you the end result.


Weddings should be very personal to who the people are as a couple.  My husband and I think we did a great job of representing who we are.  Happy Anniversary Dan.  Here's to many more years together!


Related Posts Plugin for WordPress, Blogger...