


I have always wanted to have a house that has an exposed brick wall.
It just adds so much character and gives it a real historic feel.
Being that our house is brand new, we don't have the option of
tearing out old walls and finding a beautiful hidden brick treasure.
So what did we do? We created our own!
There was this awkward wall between our kitchen and living room
that I just wasn't sure what to do with.
(This was after we tore the trim off and started the process)

Was it the kitchen? Was it the living room?
I wasn't sure.
So I knew I wanted to accent it somehow. Wallpaper, accent paint color, picture wall?
This is where my husband took a deep breath and braced himself for what was about to come.
He loves it when I search for ideas :)
Brick!
We looked around all of the home improvement stores for the brick veneer tiles and it was SUPER expensive. This wall isn't that big - about 100 square feet. With the brick veneer tiles that they sell, it was going to cost about $1000! Not what we wanted to spend.
So, being our frugal selves, we decided that we would make our own brick veneer.
We were lucky enough to be given all of these beautiful bricks!

They were a mess! They had been sitting in a wooded area for who knows how long.

We just had to wash them, rid them of their former tenants (there were TONS of these),

and cut them. We cut both sides off of them. So we got 2 veneer pieces from each brick.


Yes...all 200 of them.

So here's our homemade veneer...

Now it was time to prep the wall and start putting it up.
We added cement board to the wall and then started putting the brick tiles up with versabond.

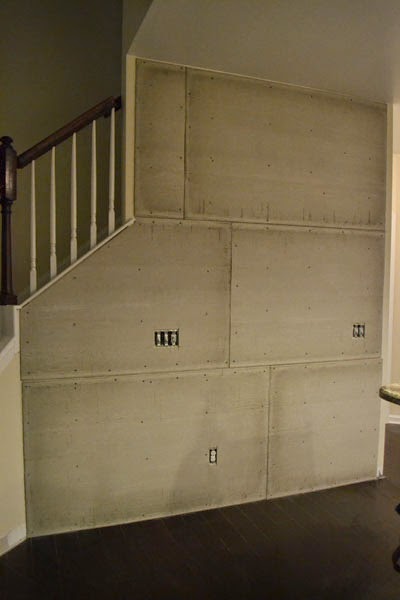

We added spacers in between while it was still wet for even spacing and to prevent the tiles from slipping.


Oh, and you have to use these spacers on your outlets and light switches
since your wall is sticking out a lot further now.

Once all of the bricks were up, it was time for the grout.

We put this in by using a grout bag. This thing could ice like a million cupcakes :)

Let it sit for a few minutes and then smooth it out with this handy little tool.


And there ya go!
A beautiful brick wall.

It was definitely an intense process but it was well worth it.
I think this was a great way to accent this wall and I couldn't be happier with the way it turned out!
How do you accent random walls??


1 comment:
SO pretty! I love exposed brick!
Post a Comment